

Building Rich Text: Inline Layouts & Emojis
Classic game UI elements like Quest Logs, Chat Boxes, and Kill Feeds frequently require you to mix standard text with inline images, icons, and emojis.
Because Gameface uses a flex-based layout algorithm internally, combining these elements naturally leads to severely broken text wrapping.
This guide covers how to bypass this engine behavior using the cohinline attribute, how to perfectly align icons with text ,
and how to properly render modern emojis .
Inline Behavior in Gameface
Section titled “Inline Behavior in Gameface”Gameface handles inline elements differently than a standard web browser. Specifically, Gameface has non-standard support for inline layout. If you try to mix text and images, the Gameface flexbox layout completely fails to wrap decorated or styled text correctly.
Consider a simple line of text that contains an emphasized word:
import InlineTextBlock from '@components/Basic/InlineTextBlock/InlineTextBlock';
const RichTextExample = () => { return ( <InlineTextBlock> This is a <span class="text--bold">simple </span>text line with an emphasized word in it. </InlineTextBlock> );};<p> This is a <b>simple </b>text line with an emphasized word in it.</p>When Gameface’s flex layout algorithm resolves this container, it identifies three completely distinct children:
- the first text node (“This is a ”),
- the
<b>element (“simple ”), - and the final text node (“text line…”).
Because it treats them as three separate flex boxes , when there isn’t sufficient space on the row, Gameface wraps the entire box to the next line. This results in text wrapping awkwardly between the HTML nodes rather than naturally between the words:
instead of:
This is a simple text line with an emphasized word in it.
Having very long phrases results in even worse wrapping and could lead to having decorated short phrases alone in the line:
… end of a long phrase
emphasized
another long phrase …
Enabling Natural Wrapping with cohinline
Section titled “Enabling Natural Wrapping with cohinline”To resolve this specific Gameface engine limitation, we implemented a custom inline layout algorithm .
It allows images, icons, and styled <span> tags to sit perfectly inside a sentence and wrap exactly like normal words.
This algorithm can only be used inside <p> elements and is enabled by adding the special cohinline attribute.
Here is how you use cohinline to resolve the issuue mentioned above:
import InlineTextBlock from '@components/Basic/InlineTextBlock/InlineTextBlock';
const FixedInlineText = () => { return ( <InlineTextBlock> This is a <span class="text--bold">simple </span>text line with an emphasized word in it. </InlineTextBlock> );};<p cohinline> This is a <b>simple </b>text line with an emphasized word in it.</p>By placing the elements inside a cohinline paragraph, they are correctly inlined and the text wraps naturally.
This is a simple text line with an emphasized word in it.
Vertical Alignment Quirks
Section titled “Vertical Alignment Quirks”When mixing text and images (like inserting a controller button prompt inside a sentence), you will use the vertical-align CSS property. Standard values like middle, text-top, and baseline are all supported inside cohinline paragraphs.
However, cohinline handles vertical space differently than a web browser, which often leads to misaligned icons if you aren’t expecting it.
The Problem: Ignored Image Heights
Section titled “The Problem: Ignored Image Heights”In a standard web browser, if you drop a large 40px image into a line of smaller 24px text, the browser automatically stretches the line’s height to fit the big image.
Gameface does not do this. It calculates the height of the line based only on the text, completely ignoring the image size. If you tell a 40px image to align middle inside a tiny 24px text box, the alignment fails. The image simply overflows the box and looks awkwardly positioned.
import InlineTextBlock from '@components/Basic/InlineTextBlock/InlineTextBlock';import Image from '@components/Media/Image/Image';
const InstructionBar = () => { return ( <InlineTextBlock class="instruction"> Press <Image src="./assets/icons/xbox-a.png" class="btn-icon" /> to jump </InlineTextBlock> );};<p class="instruction" cohinline>Press <img src="xbox-a.png" class="btn-icon"> to jump</p>/* ❌ The image will look misaligned because the paragraph is too short! */.instruction { font-size: 24px;}
.btn-icon { height: 40px; width: 40px; vertical-align: middle;}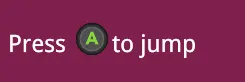
The Solution: Explicit Line Heights
Section titled “The Solution: Explicit Line Heights”To fix this, you must manually stretch the paragraph’s height so the image has enough room to properly center itself.
You do this by explicitly setting the line-height of the <p> element to match the exact height of your largest inline image. Once the line is 40px tall, vertical-align: middle works as expected.
/* ✅ The paragraph is manually stretched, fixing the alignment */.instruction {    font-size: 24px;    /* 1. Force the paragraph's line-height to match the image height */    line-height: 40px;}
.btn-icon {    height: 40px;    width: 40px;    /* 2. The icon now perfectly aligns to the middle of the 40px line */    vertical-align: middle;}
Rich Text with Emojis ✨
Section titled “Rich Text with Emojis ✨”Global chat systems, player profiles, and clan descriptions often require emoji support to enhance the visual fidelity of the text. Since version 1.61, Gameface natively supports loading fonts that contain color emoji characters.
Supported Emoji Formats 🚀
Section titled “Supported Emoji Formats 🚀”Gameface specifically supports two types of emoji font encodings:
COLRv0: The standard format used by popular fonts like Twemoji, OpenMoji, and Windows’ native Segoe UI Emoji.COLRv1: A more modern format (used by fonts like Noto Color Emoji) that supports complex graphics features like gradients and advanced blending between parts of the glyphs.
If a font file happens to use both COLRv0 and COLRv1 tables to store the same color glyph, Gameface is smart enough to prefer the higher-fidelity COLRv1 table for rendering.
Implementing Emojis & Font Fallbacks 📖
Section titled “Implementing Emojis & Font Fallbacks 📖”When building something like a global chat box, you have no idea if a player is going to type a normal sentence, a string of emojis, or a mix of both.
You absolutely do not want to set your primary font-family exclusively to an emoji font, as that would ruin your UI’s standard typography. Instead, you integrate emojis seamlessly by leveraging a CSS font fallback array.
Here is the complete picture of how to load the fonts, set up the fallback, and write the markup for a rich chat log:
/* 1. Load your standard UI font */@font-face {    font-family: 'Droid Sans';    src: url('../fonts/DroidSans.ttf');}
/* 2. Load your supported COLRv0 or COLRv1 emoji font */@font-face {    font-family: 'OpenMoji';    src: url('../fonts/OpenMojiCOLRv0.ttf');}
/* 3. Apply the fallback array to your text containers */.chat-message {    /* Standard text uses Droid Sans, missing characters fall back to EmojiTwo */    font-family: 'Droid Sans', 'OpenMoji';    color: white;    font-size: 20px;}
Once the fallback is set up in your CSS, adding emojis to your UI is incredibly straightforward.
You can output them in your HTML using standard text methods, while also relying on cohinline to keep your inline styles and emojis wrapping perfectly:
import Block from '@components/Layout/Block/Block';import InlineTextBlock from '@components/Basic/InlineTextBlock/InlineTextBlock';
const ChatBox = () => { return ( <Block class="chat-box"> <InlineTextBlock class="chat-message"> PlayerOne found a <span style={{ color: '#FFD700' }}>legendary </span>item! 🎟 </InlineTextBlock> <InlineTextBlock class="chat-message"> PlayerTwo: Let's goooo! 🎟️ </InlineTextBlock> </Block> );};<div class="chat-box"> <p class="chat-message" cohinline> PlayerOne found a <span style="color:#FFD700">legendary </span>item! 🎟 </p>
<p class="chat-message" cohinline> PlayerTwo: Let's goooo! 🔥⚔️ </p></div>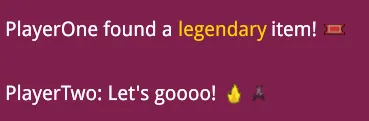
© 2026 Coherent Labs. All rights reserved.